
I thougth I should tell you how I worked the edge to make it even and straight instead of leaving it zig zag...

Here's what I did...
I crocheted all the ripples following Lucy's method of Neat Ripple at Attic24. (I love her blog and colorful inspiration)
140 chains to start I think... all the way up until the desired size of the blanket...
So the edge of it...........
Starting on the top part of the zig-zag, the "Mountain" as Lucy call it, I worked sc's... and on my way down to the "Valley" I worked 2 hdc, 2 dc and 2 tr (one on each decrease of the valley), then up again:: 2 dc, 2 hdc and 4 sc (one on top of each of the V increases, as there's 2 increases, that makes 4 dc to work on sc)... then down and up again....
I got to the corner and worked a sc in the last stitch, then a chain and another sc in the same stitch... sc all the way down, making 2 sc on each dc (4 sc by color stripe as my stripes are 2 rounds of color).
Again to the corner:: sc, ch 1, sc...
And continue with the lower part of the blankie... now the valleys are the mountains and the mountains are the valleys if you know what I mean... this is because you are holding it up side down...
But you work the same as before...
I have to confess that I didn't worked the same as the top part... here I worked sc on top of the mountains (4 of them), 3 hdc, 4 dc, 3 hdc and back to 4sc...
It just worked like that for me... I don't know if the first group of stitches is better than the second one, but both my edges are straight now... and I like the look of it... a LOT!!!!
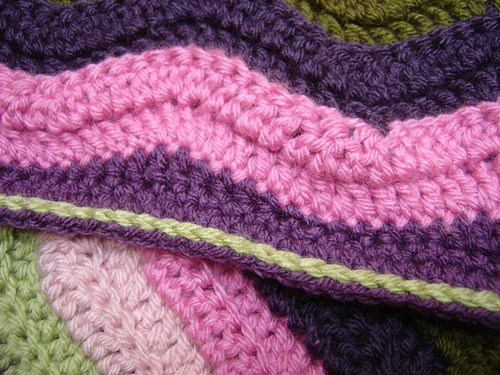
Here's a closer picture, I hope you can see it...
I finished the row going up on the other side of the blanket 2 sc on each dc... and made 2 other rows, one in sc and the last one in hdc... and then the sl st row in green on the top row of purple...
Hope this is useful for you!!!
See you soon!
S.
thank you so much
ReplyDeleteI think you did a great job on making a straight edge. Don't you just love all the bright colors at attic 24 ? You cannot help but smile when you go to her blog. Speaking of colors, yours are very enchanting also, great job there ! I have signed on as a Follower so now I will know what you are up to =) Take care
ReplyDeleteVery, very pretty. you've done a wonderful job.
ReplyDeleteI love the colors you used and I really like the straight edge. Beautiful work!
ReplyDeleteThank you for visiting my blog!
ReplyDeleteI love your Ripple blanket, the colours are beautiful and the edge looks great!!
I love this pattern too and thank you for sharing your edge picture and pattern. Thank you thank thank you!
ReplyDeleteThank you! I had made a ripple (also from Attic 24) but wasn't really happy that it was finished off until I followed your instructions and put a square border on it. Thanks to you it looks great now :-)
ReplyDeleteThank you, thank you, thank you! This is so simplet once you get the hang of it. My brain would have gone into hibernation if I had to work this out myself.
ReplyDeleteI'm making a ripple following the attic24 instructions and was just wandering how I will edge it - this is very useful - thank you .
ReplyDeleteIs this written in American terms? Thanks for the instructions. I hope to try it with my next baby ripple.
ReplyDeleteYes, it is written in American terms..
Delete:o)
Thanks!!
ReplyDeleteThis was the exact thing I was looking for. Thanks for sharing and making it easy for me!
ReplyDeleteThanks so much for this tutorial! I was trying to figure out how to edge my ripple blanket and this fit perfectly! I filled in the ripple with the same color as the end ripple and then edged it with another solid color in SC and then a row of HDC and finished it off. Very cute edging for a boys baby blanket!
ReplyDeleteThis might sound like a silly question (i'm pretty much a beginner!), but did you weave in the ends from the ripple colour changes before you did your straight border?
ReplyDeleteI wove the ends as I went, meaning that every time I changed a color, in this case every 2 rows, I held the tails of yarn against the crochet fabric of the ripple and crocheted over them the new stitches, so they would be tucked in and secure and I didn't have to spend extra time weaving them in. Hope that's helpful!
DeleteI'm new to crochet and I'm a little confused. You said to start at the top of the mountain with single crochet. Am I starting in the upper left corner? Or just the top of any mountain? Also how many single crochet do I work before I start the 2 hdc?
ReplyDeleteI'm just a little confused and any help would be great!
You can do either. Change color when you finish your last row of the ripple to the color you want for the border and you should be on the top of the mountain ready to start... You can also fasten off the ripple and join the new yarn for the border with a slip stitch in any top of the mountain. Just remember that you'll work the shortest stitches (sc) on top of the mountains and "grow" the stitches as you go to the valley where you'll work double crochets...
Deletesc,sc, hdc, hdc, hdc, dc, dc, dc, dc, hdc, hdc, hdc, sc, sc -- repeat.
You work 4 sc at the top of the mountain, one in each dc of the increases (2 increases of 2 dc each = 4 dc)
Hope that helps!!
This comment has been removed by the author.
ReplyDeleteThanks so much for this tutorial. I am making this very same blanket at the moment. I love the simple 4-4-4 formula, makes it easy to keep track while I watch a movie. Mine is in cream with cocoa and mocha stripes, and I really wanted to do it square so I can put a lace edge around it (eventually), so I am delighted to find that you've worked it all out for me - yahoo! Thanks again, oh and I love your purples and greens, just gorgeous.
ReplyDeleteThank you so much for this tutorial! I used it a couple of years ago on a baby blanket from the neat ripple pattern, and am making it again, but had forgotten to bookmark where this tutorial was! Thanks so much!
ReplyDelete:) glad you find it helpful!!
Deletenew to crochet and doing a zig zag afghan and love your border. Can you explain a little better how you did the border?
Delete